About the monthly status report
This Quick Reference Guide (QRG) covers the process for performing Kahua updates for the Monthly Status Report. It walks you through the steps of updating your project in the following apps:
Funding information loaded by the Office of Budget Team and estimates in the Estimates and Funding app are also visible on the fact sheet.
Projects app updates
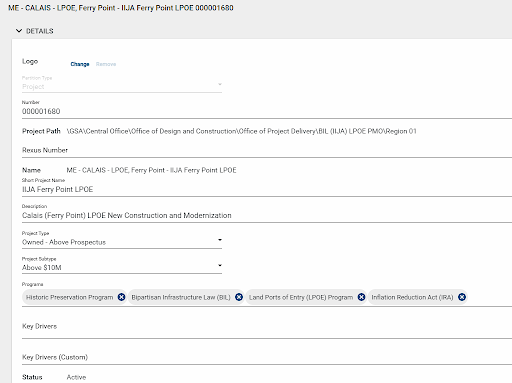
After a project has been created, changes can be made to any of the existing data in the Project form.
The following roles have permission to perform this activity: GSA-PM/COR, GSA-Regional Manager, and GSA-Project Creator.
- Open the project using Project Finder in the left navigation pane.
Click the “i” icon next to the project name.
- Click the Edit button on the top toolbar of the Project Details, which opens the project for editing.
- Update all applicable fields.
Click the Change link to upload a picture. If you do not upload a photo, the default GSA logo will be shown.
- Select a photo from your local computer. The name of the photo is populated in the File name field.
- Click the Open button.
- Click OK in the Add Files window.
- Update the project’s Description as needed.
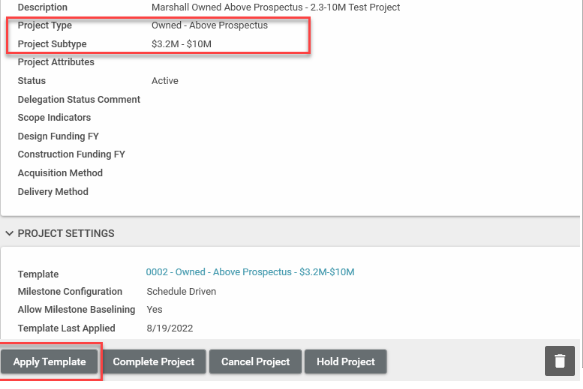
- Update the Project Type and Project Subtype, as needed.
- In the Programs field, select Programs as needed.
- Select the appropriate Building Number in the Buildings section.
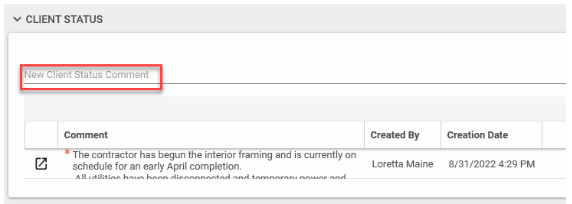
Use the Client Status field to write a short narrative update about the project. Each Client Status entry creates a new row in the section and includes the Comment, Created By, and Creation Date (and time).
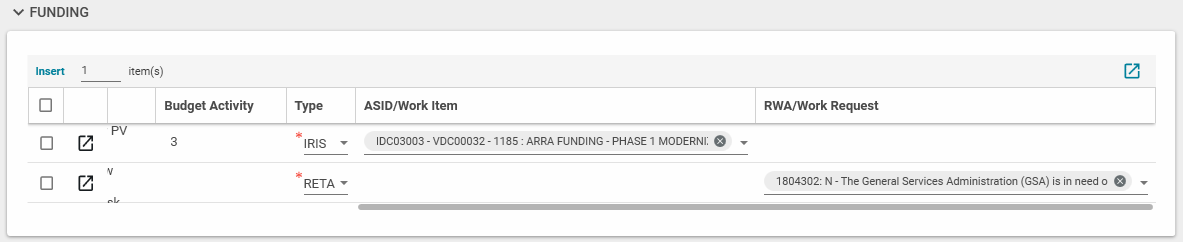
The Funding section is where ASID/Work Items and RWA/Work Requests should be entered. The IRIS Work Items and RETA Work Requests listed in this section are linked to several apps within Kahua. They also determine funding information that is integrated with IRIS or RETA, so it is important this information stays updated.
- Click Insert to add a new row, and select IRIS or RETA from the Type drop-down list.
- Select the appropriate number from ASID/Work Item drop-down list or the appropriate number from the Work Requests list.
- You can also delete or edit items as needed.
Roster
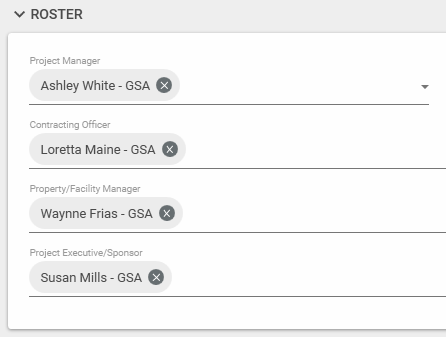
- Click the triangle to select a Project Manager. The individual selected here will automatically have PM/COR access to the project. Changing the Project Manager in the Project form gives the new Project Manager GSA-PM/COR permissions and removes the permission from the previously listed Project Manager.
Click the triangle to select a Contracting Officer, Property/Facility Manager and Project Executive/Sponsor.
Note: Adding a Contracting Officer, Property/Facility Manager, or Project Executive/Sponsor to the Project Roster section does not add the user to the Project Directory. Consult the Project Directory QRG for more information.
- Select the project’s Agency Bureau(s) from the drop-down list. This list is populated via integration with RETA.
- Click the Save/Close button.
If changes were made to the Project Type and/or the Project Subtype in the Details section, click the Apply Template button at the bottom of the read-only Project form to update the template used for the project. The Template Last Applied is updated with the new date.
- To close the form, click the X in the top right corner.
Milestones app updates
(For owned - projects below $50K and owned - projects $50K - $250K)
Milestones are loaded into a project depending on the Project Type and Subtype that were selected in the Projects app when the project was created. The table below shows the Type and Subtype combinations where milestones can be edited directly in the Milestones app.
| Type | Subtype |
|---|
| Owned – Below Prospectus | Below $50K |
| Owned – Below Prospectus | $50K - $250K |
| Lease – Below Prospectus | Lease Alteration |
| Lease Acquisition | Lease Acquisitions Above Prospectus |
| Lease Acquisition | Lease Acquisitions Below Prospectus |
| Other | Special Programs Division (SPD) Services |
| Other | Non-Space Projects |
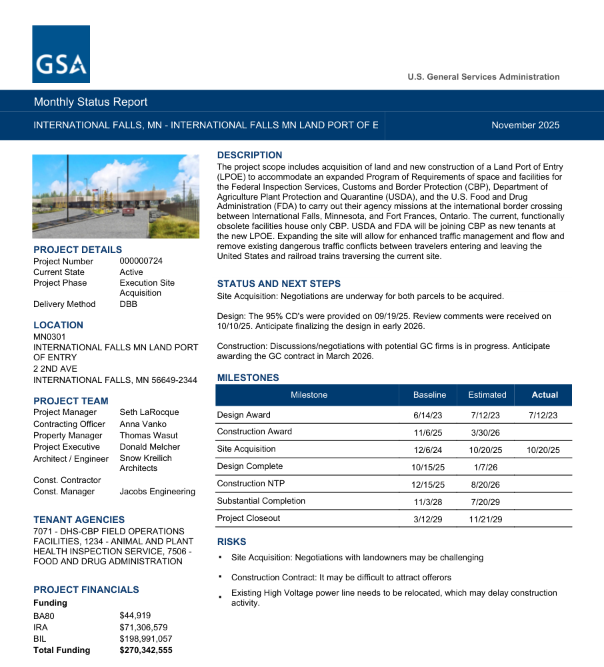
The following milestones are shown on the Monthly Status Report: Design Award, Design/Build Award, Site Acquisition, Design Complete, Construction NTP, Substantial Completion, and Project Closeout. Notice of Intent to Award (NOITA), Preliminary Assessment (PA) End, and Investment Grade Audit (IGA) Complete are shown for ESPC projects.
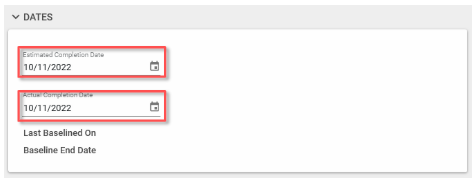
For each milestone, the baseline, estimated, and actual dates are displayed.
Edit a milestone
The following roles have permission to perform this activity: GSA-PM/COR and GSA-Project Creator.
- Navigate to a project using Project Finder in the launch bar.
- Open the Milestones app from the apps launcher under the Schedule Management section.
If not displayed already, change the Log View to Applicable by clicking the down arrow in the Log View list.
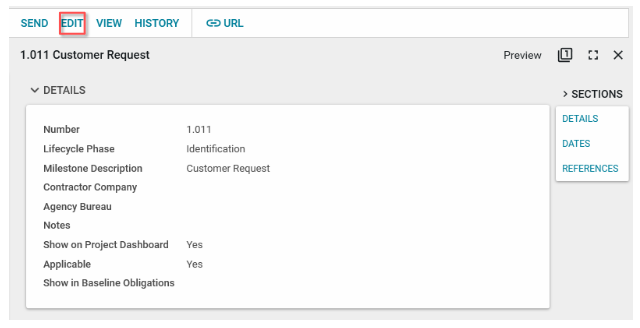
- Click the appropriate Milestone.
Click the Edit button.
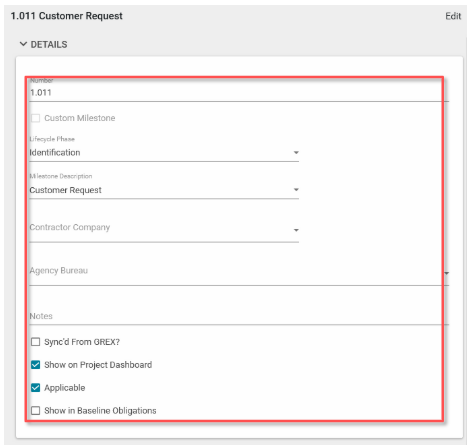
Make any updates within the Milestone document.
- When edits are complete, click the Save/Close button.
Scheduling app updates
(For above prospectus - owned, leased, owned - projects above $250K and prospectus lease post occupancy projects above $10M)
Milestones are loaded into a project depending on the Project Type and Subtype that were selected in the Projects app when the project was created. The table below shows the Type and Subtype combinations where milestones can be edited directly in the Milestones app.
| Type | Subtype |
|---|
| Owned – Above Prospectus | Above $10M |
| Owned – Above Prospectus | $3.2M - $10M |
| Lease Above Prospectus | Lease Alteration |
| Owned – Below Prospectus | Above $250K |
The following milestones are shown on the Monthly Status Report: Design Award, Design/Build Award, Site Acquisition, Design Complete, Construction NTP, Substantial Completion, and Project Closeout. Notice of Intent to Award (NOITA), Preliminary Assessment (PA) End, and Investment Grade Audit (IGA) Complete are shown for ESPC projects.
For each milestone, the baseline, estimated, and actual dates are displayed.
Access the MS project schedule templates
- Download the applicable template for your project from the MS Project Schedule Templates in Google Drive.
- Open the schedule file on your computer and make updates using MS Project and save them locally to your computer, so they can be uploaded to Kahua. See Step 7, below.
Note: Take care if you delete tasks from the template schedule to ensure that doing so will not break any schedule logic for preceding or succeeding tasks. The file includes all the standard schedule tasks and appropriate coding to connect your schedule updates to the Milestones app in Kahua. You can add other tasks for any project specific tasks that you need to track.
Add the PM schedule
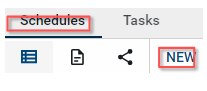
In the Scheduling app, open the Schedules sub-app from the top ribbon and click NEW.
- Enter the Name of the schedule.
- Click on Select File.
- Click on the Filename field in the Upload File window.
- Select the schedule you saved in Step 2 above.
- Click Upload in the Upload File window.
- Click OK on the Add Files window.
- Enter a Description of the schedule.
- Save/Close to save the file to the record.
- Click on Process to pull in Scheduling Tasks and update the Milestones.
Manage tasks items
- Click on the Tasks sub-app in the top ribbon.
Select the Tasks item to edit.
- Click Edit from the top of the View pane.
- Make changes to any editable field(s). Most fields need to be edited in the scheduling software and then uploaded to Kahua through the revision process.
- Click Save/Close at the bottom.
Navigate to the corresponding milestone
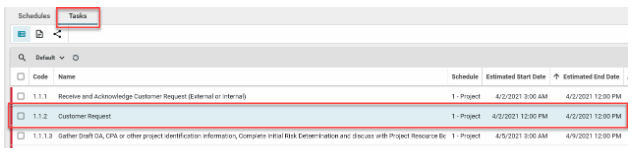
- With the Tasks sub-app open, select the Scheduling Task item.
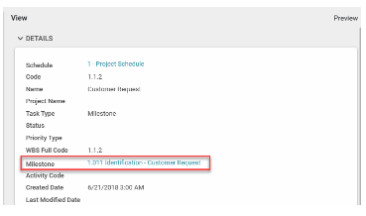
Click on the Milestone name. The text is blue to indicate that it is a link to the Milestone.
- The Details of the corresponding Milestone are open in the Milestones app.
Revise a schedule
- With the Schedules sub-app selected in the top ribbon, click NEW to open a new record.
- Enter the Name of the schedule.
- Enter the Revision number.
- Click on Select File.
- Click on the Filename field in the Upload File window.
- Select the revised schedule template file.
- Click Upload in the Upload File window.
- Click OK on the Add Files window.
- Enter a Description of the schedule.
- Save/Close to save the file to the record.
- Click on Process the file to show Scheduling Tasks and Revise the Milestones.
Risk register app updates
The following risk information is shown on the Monthly Status Report: Brief Risk Description for every risk marked as Include on Program Dashboard.
Create a risk item
This action is typically created by the following roles: GSA-Regional Manager, GSA-PM/COR, EXT-PM, EXT-CMa, or EXT-CMa (Limited).
- Open the project using Project Finder in the launch bar.
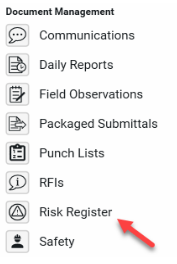
Select Risk Register in the Document Management section of the apps launcher.
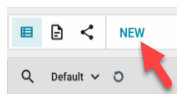
Click NEW to create a new Risk Register.
Details section
- The Number and Date Identified fields auto-populate, but they can be changed if necessary.
- Enter a Brief Risk Description.
- Enter a Detailed Risk Description.
- Select a Responsible Individual from the drop-down list.
- Select the Project Phase of Occurrence from the drop-down list.
- Place a check in the Include on Program Dashboard box if the Risk Register record should be included on the Program Dashboard (i.e., Dashboard app) or on Kahua fact sheets.
Status section
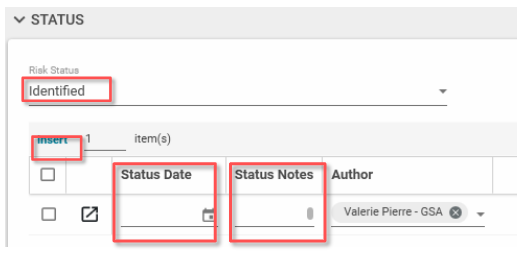
- The Risk Status defaults to “Identified.” If needed, you can select another status from the drop-down list.
- If applicable, change the number 1 to the number of Risk Status Notes needed, then click Insert.
- Update the Status Date field with the appropriate date.
Update the Status Notes field with details related to the status for the date that was selected. If needed, multiple Status Notes can be entered.
Select the top 3 risks — these may vary on a monthly basis.
Example of a good risk narrative:
“It may be difficult to source IRA Compliant Materials per Low Embodied Carbon (LEC) requirements” or
“To accelerate the schedule, the construction documents may need to be split into multiple bid packages, creating potential for waste and/or inefficient design.”
Assessment section
- Select as many Categories Impacted as needed.
- Enter details of the impact in the Impact Description field.
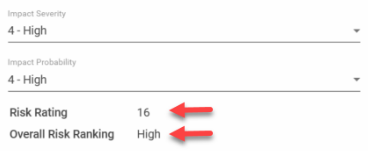
- Select an Impact Severity value from the drop-down list.
- Select an Impact Probability from the drop-down list.
Once the Impact Severity and Impact Probability values have been selected, click Save to calculate the Risk Rating and Overall Risk Ranking.
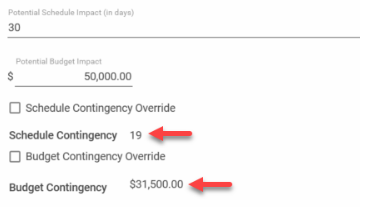
- If any of the Impacted Categories present a risk to the Project Schedule, fill in the Potential Schedule Impact (in days) with a whole or partial number of impact days.
- For capital projects, enter the Potential Budget Impact dollar amount.
Once a Potential Schedule Impact and/or Potential Budget Impact value is entered, click Save for Kahua to calculate the Schedule Contingency and/or Budget Contingency value.
Note: Any changes made to the Risk Rating value (composed of the Impact Severity and Impact Probability fields), Potential Schedule Impact value, or Potential Budget Impact value will change the Schedule Contingency and/or Budget Contingency values.
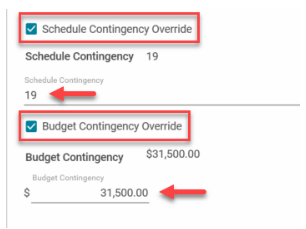
- If the Schedule Contingency value needs to change or be overridden, check the Schedule Contingency Override box, and enter in a value for the Schedule Contingency in the space provided.
If the Budget Contingency value needs to change or be overridden, check the Budget Contingency Override box, and enter in a value for the Schedule Contingency in the space provided.
- For capital projects, enter the amount of Potential Additional Funds Needed.
- For capital projects, put a check mark in the Will this budget impact be supported within the project contingency? box as applicable.
- Enter a date in the Projected Date Funds Are Needed field.
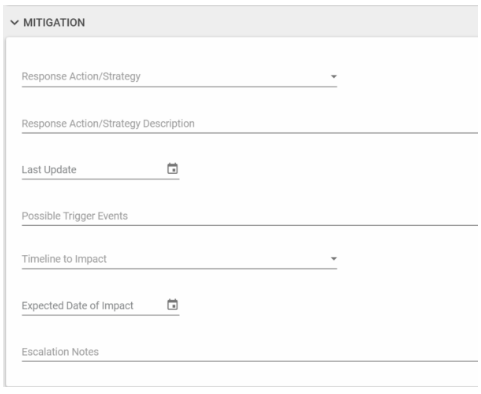
Mitigation section
- Select the appropriate Response Action/Strategy from the drop-down list.
- Enter a Response Action/Strategy Description.
- Enter a date in the Last Update field.
- Fill in an appropriate value for Possible Trigger Events.
- Establish a range in the Timeline to Impact.
- Identify the Expected Date of Impact.
Enter Escalation Notes as needed.
Reference section
- Attach any supporting documentation such as photos or pdf files by clicking UPLOAD or ADD KAHUA DOC, navigating to the appropriate file, clicking Open, adding Comments, and clicking OK.
- Click Save/Close to complete the creation of the Risk Register Record.
Project directory
The Monthly Status Report displays the following team members from the Project Directory app: Assistant PM, COR, and Contract Specialist. Additionally, vendor company names are listed for the following roles: Architect / Engineer, Construction Contractor, and Construction Manager.
The Project Manager, Contracting Officer, Property Manager, and Project Executive are entered in the Roster section of the Projects app.
- Navigate to a project using Project Finder in the launch bar.
- Open the Project Directory app from the apps launcher.
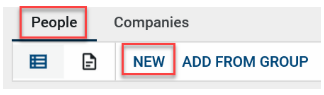
- Select the People sub-app.
Click NEW from the People sub-app.
Details section
Select the contact person in the Name field. If applicable, the Office field will populate.
Note: The contact must exist in the Kahua Contacts app prior to being added to the Project Directory.
- If applicable, fill in the Contact Team Role, Contact Team Function, Status on Project, and any additional Notes.
- Once selected, click the Add button.
Financials
The Monthly Status Report displays a total of all BA11, BA12, BA13, BA14, BA21, BA24, BA27, BA51, BA54, BA55, and BA80 funding.
BA11, BA12, BA13, BA14, BA21, BA24, BA27, BA51 and BA55 funding is entered in the Funding Authority app by the Central Office Budget team. No action is required for the Project Manager.
BA54 and BA80 funding is pulled into the Kahua from the source system (IRIS for BA54 and RETA for BA80) in the Estimates and Budgets app when a funding number is entered in the Projects app.
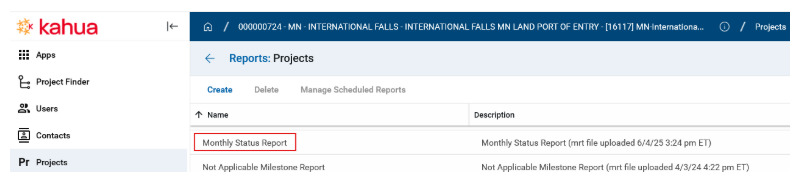
Run the monthly status report
- Navigate to a project using Project Finder in the launch bar.
- Once in the desired project, click the apps launcher in the launch bar.
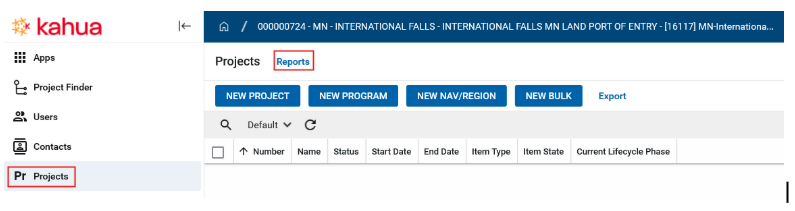
- Click the Projects app.
Click the Reports link above the log view to access the reports.
Select the Monthly Status Report in the list, and click the View button at the bottom of the window to launch the report.
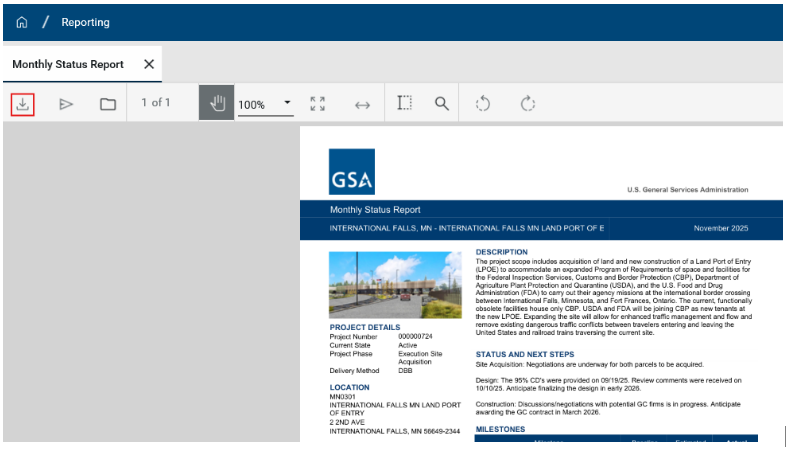
To download the report once it has launched, click the down arrow in the report toolbar.
Clicking the arrow opens the report in a new browser window with options to print the report or download to your local computer.
- Close the View using the X in the report toolbar.

 U.S. General Services Administration